Context: I got this error when running tensorflow with python on Ubuntu 20.04, after installing the cuda toolkit by choosing the local deb installation file.

Solution: the solution was to download and install the deb network file instead
Context: I got this error when running tensorflow with python on Ubuntu 20.04, after installing the cuda toolkit by choosing the local deb installation file.
Solution: the solution was to download and install the deb network file instead
Error:
git revert 75a690a642b71768dad36ade65839a6da62d8d6a
error: commit 75a690a642b71768dad36ade65839a6da62d8d6a is a merge but no -m option was given.
fatal: revert failed
Solution:
run the following command in the terminal:
git cat-file -p 75a690a642b71768dad36ade65839a6da62d8d6aOutput:
git cat-file -p 75a690a642b71768dad36ade65839a6da62d8d6a
tree 6ee9397d91ed42ad3d130b93c5c5587d1ad6c67c
parent 95beda2bfbfa1523cb14c1285d80a5faa9b7f6f0
parent a3e9ddabca322e52b141a001dc5eb9c2c789ff22
run
git revert 75a690a642b71768dad36ade65839a6da62d8d6a -m 1 if you want to use the first parent as mainline, choose 1, else choose 2
Browserstack resources:
https://www.browserstack.com/docs/live/local-testing
1 – Install the browserstack local binary
https://www.browserstack.com/browserstack-local/BrowserStackLocal-linux-x64.zip
2 – cd in the directory where the binary is located and run:
./BrowserStackLocal --key t9guUg6zxQ5Y9MBfciaZ3- in your browser access borwserstack and tick “Resolve all URLs through my network
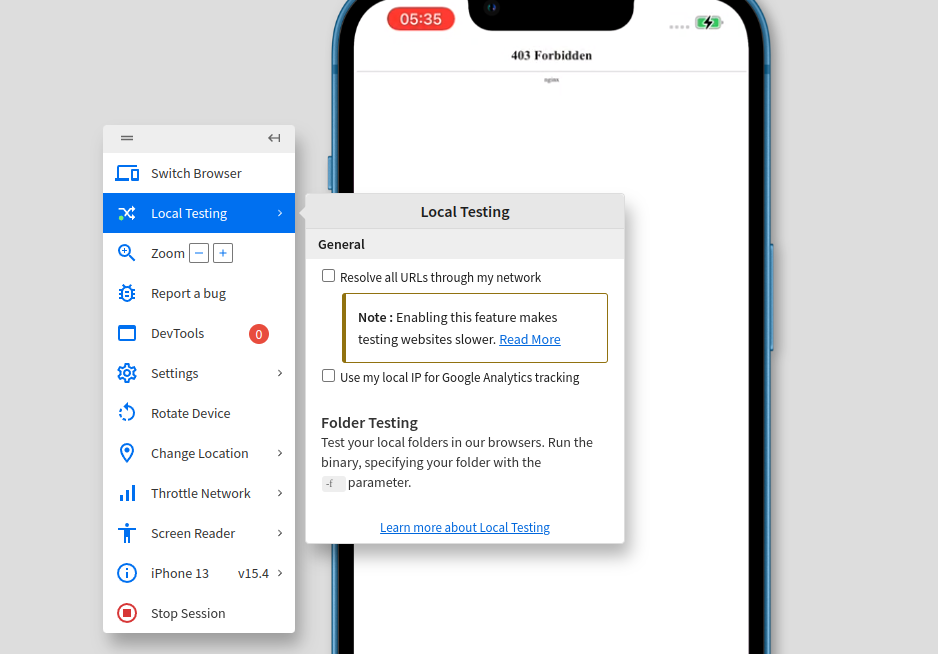
you can also do that throught cli when running the binary:
./BrowserStackLocal --key t9guUg6zxQ5Y9MBfciaZ --force-localFor local testing, ensure that localhost is served on bs-local.com
see https://www.browserstack.com/docs/live/local-testing/test-using-local-testing
To verify if a commit is an ancestor of another commit, the best solution is to run the following command:
git merge-base --is-ancestor <possible-descendant-commit-hash> <possible-ancestor-commit-hash>; echo $?
It will output 1, if possible-ancestor-commit-hash is an ancestor of possible-descendant-commit-hash.
#delete tag from local
$ git tag -d <tag_name>
#delete tag from remote
$ git push --delete origin tagname
https://git-scm.com/book/en/v2/Git-Basics-Tagging
$ git tag -a v1.2 9fceb02 # -a flag is to add annotation in vim
$ git push v1.2Examples:
if (vars.get(“price_matchNr”) instanceof Integer){
log.info(“integer”);
}
if (vars.get(“price_matchNr”) instanceof String){
log.info(“string”);
}
if (Integer.parseInt(vars.get(“price_matchNr”)) instanceof int){
log.info(“int”);
}
if (Integer.valueOf(vars.get(“price_matchNr”)) instanceof Integer){
log.info(“Integer ValueOf”);
}
sudo apt install tesseract-ocr
Install python3-pil
sudo apt-get install -y python3-pil
Insall pytesseract:
pip install pytesseract
Testing Tesseract.
Call the Tesseract engine on the image with image_path and convert image to text, written line by line in the command prompt by typing the following:
$ tesseract image_path stdout
To write the output text in a file:
$ tesseract image_path text_result.txt
To specify the language model name, write language shortcut after -l flag, by default it takes English language:
$ tesseract image_path text_result.txt -l eng
By default, Tesseract expects a page of text when it segments an image. If you’re just seeking to OCR a small region, try a different segmentation mode, using the –psm argument. There are 14 modes available which can be found here. By default, Tesseract fully automates the page segmentation but does not perform orientation and script detection. To specify the parameter, type the following:
$ tesseract image_path text_result.txt -l eng --psm 6
There is also one more important argument, OCR engine mode (oem). Tesseract 4 has two OCR engines — Legacy Tesseract engine and LSTM engine. There are four modes of operation chosen using the –oem option.
0 Legacy engine only.
1 Neural nets LSTM engine only.
2 Legacy + LSTM engines.
3 Default, based on what is available.
sudo apt-get install tesseract-ocr-[lang]
pip install pytesseract
pip install opencv-python
To avoid all the ways your tesseract output accuracy can drop, you need to make sure the image is appropriately pre-processed.
This includes rescaling, binarization, noise removal, deskewing, etc.
To preprocess image for OCR, use any of the following python functions or follow the OpenCV documentation.
jmeter -n -t <test JMX file> -l <test log file> -e -o <Path to output folder>
https://jmeter.apache.org/usermanual/generating-dashboard.html
Generate a html report from logs
jmeter -g <log file> -o <Path to output folder>
open a terminal and cd into the directory of the repo you want to work with and run:
git rev-parse HEAD
It returns a long string similar to this:
919a3996b3093b867073ff5c662b1f2cd4393357
from which you only need the first seven caracter. You should see them in the corresponding commit in bitbucket or github to double check in case of doubt.
Running a gradle project, you may encounter the error below. In my case it occurs after the gradle project crashed, requiring a restart.
Error message:
>Could not resolve all dependencies for configuration ':classpath'.
 >Could not load module metadata from /home/username/.gradle/caches/modules-2/metadata-2.97/descriptors/io.netty/netty-common/4.1.23.Final/671a8ecc284f9e9f4d35b614eb5de66e/descriptor.bin
Solution:
You need to delete the cache
cd /home/username/.gradle
rm -r caches