Get the category archive name and description in a wordpress theme

If you need to access your achive title and or description, you can the code below. I used it to take the description as meta description. A better policy would be to write a custom metadesciption. But that’s a quick fix while you are working on a better solution.

    $title=get_the_archive_title();
    echo(explode('<',explode('>',$title)[1])[0]);
    if(get_the_archive_description()){
	echo '<meta name="description" content="'.preg_replace('/\<.*\>/',' ',get_the_archive_description()).'">';
    }

Add pagination to WordPress archives or search results.

There are several options to do so.

Here are two exemples, on being taken from the twentyfifteen template.

The class is to apply woocommerce styling in case you are using it.

      <div>
         <nav class="woocommerce-pagination bt_search_pagination"> <?php
          // Previous/next page navigation.

          the_posts_pagination(

              array(

                  'prev_text'          => __( 'Previous page', 'twentyfifteen' ),

                  'next_text'          => __( 'Next page', 'twentyfifteen' ),

                  'before_page_number' => '<span class="meta-nav screen-reader-text">' . __( 'Page', 'twentyfifteen' ) . ' </span>',

              )

          );?> 
      </nav></div>
 

A second example more compact:

     <div class="row">
          <div class="col-md-12 text-center">
              <nav class="woocommerce-pagination bt_search_pagination"><?php echo paginate_links(); ?></nav>
          </div>
      </div>

You can add this code in search.php or catregory.php

Override locotranslate translation strings

If you want to override some loco translate strings, you might have noticed a warning stating that changes to the file might be lost after wordpress/plugin/template update.

Let’s see how to avoid losing all your customization during the next update.

In Loco Translate select the plugins/theme/etc that you want to customize.

Hover over the the language you want to make changes to and click on copy.

Loco Translate let you create a copy of a translation file.

Note that system, on the right end of the picture above indicates that this is a system file and prone to be overwritten during the next update.

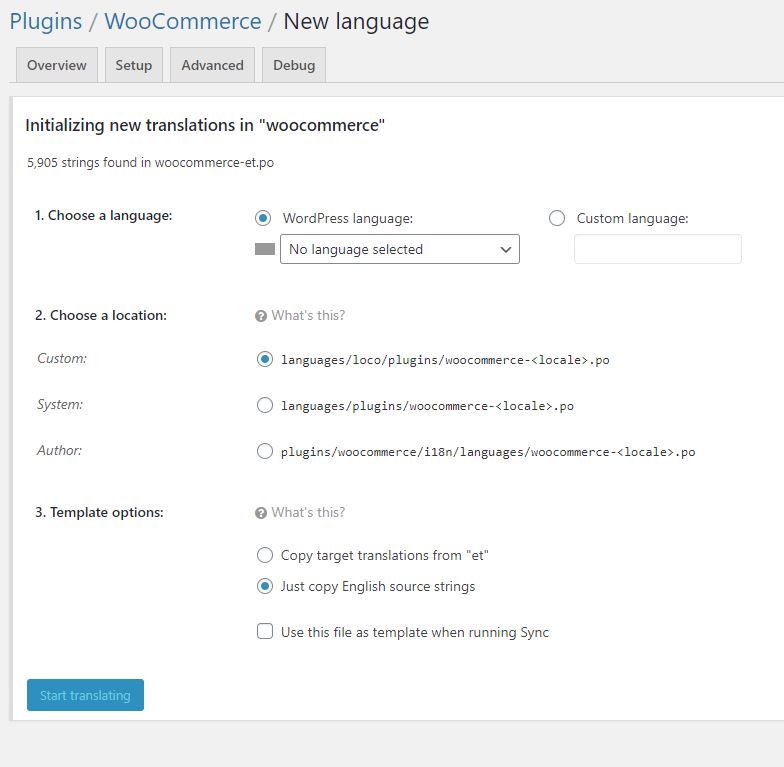
Once you have clicked on copy you are brought to a screen to set a new language. Well, good news, it doesn’t have to be a new language at all and you can create a copy of a file for an existing language. Let’s have a look at the settings.

Loco translate “New language” screen.

1- Choose the target language, in our case this is the one of the file we copied.

2- For the location, the most sensible is the custom location. System and Author might be subject to changes from update.

3- For the templates option use the “Just copy English source strings” option and changes just what you need, the rest will fallback safely on the string in the original file. If you have already make your change directly in the original then you can choose the first option.

Once you are all set, click on start translating.

If you need to edit your custom copy. Click on “Languages” in the Loco Translate menu. Choose the languagefor which you have created the copy you want to modify. You will see all templates available under WordPress Core , Plugins and Themes for this language. Look for the name of the plugin or theme you have modified. The original file will be listed as system and your copy will be listed as custom. Click on edit.

Price Filter not working

Issue: the woocommerce price filter is not working.

Solution: The issue is likely due to a compatibility issue with your theme. To solve that, you will need to declare the theme woocommerce support and copy your page.php file content to a new file that you will call woocommerce.php. You will replace the loop by <?php woocommerce_content(); ?>.

You will also need to make sure woocommerce support is declared in your theme functions.php: add_theme_support( 'woocommerce' );

For more info on woocommerce theme development and support:

https://docs.woocommerce.com/document/woocommerce-theme-developer-handbook/
Integrate woocommerce in your theme

Upload webp images to wordpress

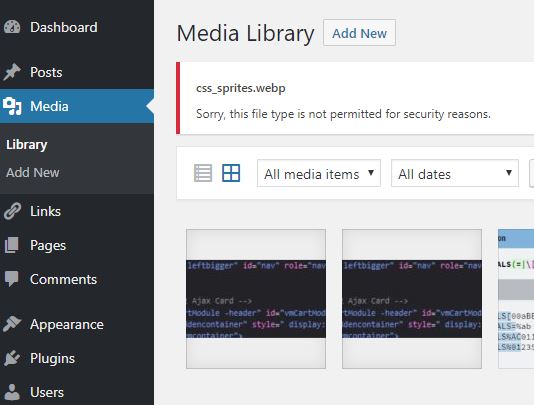
wordpress and webp: “Sorry, this file type is not permitted for security reasons.”

Error message when uploading a webp image in wordpress media library

Certain image type like svg, jpeg2000 or webp raises an error when you try to upload them in wordpress as shown in the picture above.

We have already covered how to implement webp in wordpress but there might be some cases where you might want to upload this image manually and serve them to supporting browser via your own script if necessary (that’s not the case for svg though).

Add the following snippet of code to the functions.php file of your template. Comment out or delete the line for the mime type you are not interested in.

function add_mime_types( $mimes ) {
$mimes['webp'] = 'image/webp'; 
$mimes['svg'] = 'image/svg+xml';
$mimes['jpeg2000'] = 'image/jp2'; 
return $mimes; }
add_filter( 'upload_mimes', 'add_mime_types'  );

How to debug your wordpress function to the browser console

At time, it might be useful to debug some plugin or theme function directly in your browser console. It comes handy specially if you are sending some data live with jquery to a php function when you input something here and click some button there.

Add the following function to your theme functions.php:

//Send message to the web console

function debug_to_console( $data ) {
    $consoleLog = $data;
    if ( is_array( $consoleLog ) )
          $consoleLog = implode( ',', $consoleLog);
    echo '<script>console.log( "Debug Objects: ' . $consoleLog . '" );</script>';
 } 

Now you can add debug_to_console($data ) in your theme and plugins to check what value your variable take. Replace $data with whatever value you need to monitor.

Display wp plugins script and style handle

If you are serious about your site optimization, there will be a point where you want to control all these additional scripts and stylesheets your plugins are loading on your site.

To do so you will need to know the handle that is used to identified the said stylesheets and and scripts.

One easy way is to have it displayed front end in your test environment.

Add the following code to your theme function.php:

function get_enqueued_scripts () {

    $scripts = wp_scripts();

    echo 'Enqueued scripts:
';

    foreach( $scripts->queue as $handle ) :

        echo $handle.' | ';

    endforeach;

    echo '
';

}
 add_action( 'wp_head', 'get_enqueued_scripts', 9999 ); 

And to get the handles of the enqueued style sheets:

function get_enqueued_styles () {

    $styles = wp_styles();

    echo 'Enqueued styles:
';

    foreach( $styles->queue as $handle ) :

        echo $handle.' | ';

    endforeach;

}
 add_action( 'wp_head', 'get_enqueued_styles', 9999); 

In case you don’t have a test environment (really?) you can display this info in the console, don’t forget to disable that after you are done optimizing your site.

Find woocommerce and wordpress hook

Source: http://hookr.io/filters/

Source: https://docs.woocommerce.com/wc-apidocs/hook-docs.html

Source: https://codex.wordpress.org/Plugin_API/Filter_Reference

Function reference: https://codex.wordpress.org/Plugin_API

Woocommerce hooks: https://docs.woocommerce.com/wc-apidocs/hook-docs.html

Visual guide: https://businessbloomer.com/woocommerce-visual-hook-guide-account-pages/

Modify thumbnails wrapping in woocommerce product loop

You might want to wrap your woocommerce product thumbnails in specific elements and classes.

We will explore how to do that:

wp_get_attachment_image()

It is possible to modify image wrapping by a simple hook in function.php

remove_action( 'woocommerce_before_shop_loop_item_title', 'woocommerce_template_loop_product_thumbnail', 10);
add_action( 'woocommerce_before_shop_loop_item_title', 'woocommerce_template_loop_product_thumbnail', 10);


if ( ! function_exists( 'woocommerce_template_loop_product_thumbnail' ) ) {
function woocommerce_template_loop_product_thumbnail() {
echo woocommerce_get_product_thumbnail();
} 
}
if ( ! function_exists( 'woocommerce_get_product_thumbnail' ) ) { 
function woocommerce_get_product_thumbnail( $size = 'shop_catalog', $placeholder_width = 0, $placeholder_height = 0 ) {
global $post, $woocommerce;
$output = '<div class="imagewrapper">';

if ( has_post_thumbnail() ) { 
$output .= get_the_post_thumbnail( $post->ID, $size, ); 
var_dump($output); 
} 
$output .= '</div>';
return $output;

}
}

The data from get_the_post_thumbnails() comes from: https://developer.wordpress.org/reference/functions/wp_get_attachment_image/

That’s where the img html is formed. This is what I would like to modify. That would require to rewrite the whole wordpress loop if I am not mistaken.

Accessing the image URL might be enough to get us the desired result. To be complete, we should also get the image size and class.

$image_url = wp_get_attachment_image_src( get_post_thumbnail_id($post->id), $size)[0];
get_post_meta( get_post_thumbnail_id($post->ID), '_wp_attachment_image_alt', true );

Current working code:

remove_action( 'woocommerce_before_shop_loop_item_title', 'woocommerce_template_loop_product_thumbnail', 10);
add_action( 'woocommerce_before_shop_loop_item_title', 'woocommerce_template_loop_product_thumbnail', 10);


if ( ! function_exists( 'woocommerce_template_loop_product_thumbnail' ) ) {
function woocommerce_template_loop_product_thumbnail() {
echo woocommerce_get_product_thumbnail();
} 
}
if ( ! function_exists( 'woocommerce_get_product_thumbnail' ) ) { 
function woocommerce_get_product_thumbnail( $size = 'shop_catalog', $placeholder_width = 0, $placeholder_height = 0 ) {
global $post, $woocommerce;
$output = '<div class="imagewrapper">';

if ( has_post_thumbnail() ) { 
$image_url = wp_get_attachment_image_src( get_post_thumbnail_id($post->ID), $size);
$image_url =$image_url[0];
# $output .= get_the_post_thumbnail( $post->ID, $size, ); 
$output .='<img class="lozad" data-src="'.$image_url.'" alt="">';
var_dump($output); 
} 
$output .= '</div>';
return $output;

}
}


Remove emojis script and style from wordpress

Dequeue emojis related script in your theme or child-theme function.php by adding this few lines of code:

remove_action( 'wp_head', 'print_emoji_detection_script', 7 ); 
remove_action( 'admin_print_scripts', 'print_emoji_detection_script' ); 
remove_action( 'wp_print_styles', 'print_emoji_styles' ); 
remove_action( 'admin_print_styles', 'print_emoji_styles' );