Warning: Cannot modify header information – headers already sent by resolved.

Error message: Warning: Cannot modify header information – headers already sent by ….

It might be cause by the encoding of your php file.

Verify that your php file is encoded in UTF-8 without BOM. In Notepad +:

In UTF-8 under  Encoding  choose Convert to UTF-8

The BOM, or Byte Order Mark, cause the header to be sent prematurely.

More info on how to find files encoded in UTF8-BOM.

If it doesn’t work, check that you don’t send anything before session_start()

Modify thumbnails wrapping in woocommerce product loop

You might want to wrap your woocommerce product thumbnails in specific elements and classes.

We will explore how to do that:

wp_get_attachment_image()

It is possible to modify image wrapping by a simple hook in function.php

remove_action( 'woocommerce_before_shop_loop_item_title', 'woocommerce_template_loop_product_thumbnail', 10);
add_action( 'woocommerce_before_shop_loop_item_title', 'woocommerce_template_loop_product_thumbnail', 10);


if ( ! function_exists( 'woocommerce_template_loop_product_thumbnail' ) ) {
function woocommerce_template_loop_product_thumbnail() {
echo woocommerce_get_product_thumbnail();
} 
}
if ( ! function_exists( 'woocommerce_get_product_thumbnail' ) ) { 
function woocommerce_get_product_thumbnail( $size = 'shop_catalog', $placeholder_width = 0, $placeholder_height = 0 ) {
global $post, $woocommerce;
$output = '<div class="imagewrapper">';

if ( has_post_thumbnail() ) { 
$output .= get_the_post_thumbnail( $post->ID, $size, ); 
var_dump($output); 
} 
$output .= '</div>';
return $output;

}
}

The data from get_the_post_thumbnails() comes from: https://developer.wordpress.org/reference/functions/wp_get_attachment_image/

That’s where the img html is formed. This is what I would like to modify. That would require to rewrite the whole wordpress loop if I am not mistaken.

Accessing the image URL might be enough to get us the desired result. To be complete, we should also get the image size and class.

$image_url = wp_get_attachment_image_src( get_post_thumbnail_id($post->id), $size)[0];
get_post_meta( get_post_thumbnail_id($post->ID), '_wp_attachment_image_alt', true );

Current working code:

remove_action( 'woocommerce_before_shop_loop_item_title', 'woocommerce_template_loop_product_thumbnail', 10);
add_action( 'woocommerce_before_shop_loop_item_title', 'woocommerce_template_loop_product_thumbnail', 10);


if ( ! function_exists( 'woocommerce_template_loop_product_thumbnail' ) ) {
function woocommerce_template_loop_product_thumbnail() {
echo woocommerce_get_product_thumbnail();
} 
}
if ( ! function_exists( 'woocommerce_get_product_thumbnail' ) ) { 
function woocommerce_get_product_thumbnail( $size = 'shop_catalog', $placeholder_width = 0, $placeholder_height = 0 ) {
global $post, $woocommerce;
$output = '<div class="imagewrapper">';

if ( has_post_thumbnail() ) { 
$image_url = wp_get_attachment_image_src( get_post_thumbnail_id($post->ID), $size);
$image_url =$image_url[0];
# $output .= get_the_post_thumbnail( $post->ID, $size, ); 
$output .='<img class="lozad" data-src="'.$image_url.'" alt="">';
var_dump($output); 
} 
$output .= '</div>';
return $output;

}
}
 

PHP showing as text after upgrade to Ubuntu 18.04

Description of the issue:

PHP files show as plain text in the web browser using a valid http request.

When the issue occured:

During the upgrade to Ubuntu 18.04, you might have chosen, as I did, to remove outdated packages, which has removed PHP 7.1

Noticing that, you certainly installed PHP 7.2 with the command:

sudo apt install php-pear php-fpm php-dev php-zip php-curl php-xmlrpc php-gd php-mysql php-mbstring php-xml libapache2-mod-php

and restart the apache server:

sudo service apache2 restart

Source: https://howtoubuntu.org/how-to-install-lamp-on-ubuntu

This might have not solved the issue.

If reinstalling PHP is indeed required, what brought back PHP was the following:

sudo a2enmod php7.2
sudo service apache2 restart

Indeed, in addition to reinstalling apache2, you need to re-activate php-mod in apache2. This is the meaning of a2enmod php7.2.

  a2enmod  is  a  script that enables the specified module within the apache2 configuration.

Source:  http://manpages.ubuntu.com/manpages/trusty/man8/a2enmod.8.html

TLDNR / Solution:

sudo apt install php-pear php-fpm php-dev php-zip php-curl php-xmlrpc php-gd php-mysql php-mbstring php-xml libapache2-mod-php
sudo a2enmod php7.2
sudo service apache2 restart

PHP API call. file_get_contents(…) request failed to open stream: HTTP request failed!

Issue:

When making an API call with

$json = file_get_contents($jsonurl);

You get the following error message:

file_get_contents(your.api.call) request failed to open stream: HTTP request failed!

Description:  In my case the above function works perfectly well when the php file is called from a web browser but return most of the time the aforementioned  error message when run through cron.

Solution:

Use curl to call the api.

$curl_handle=curl_init();
curl_setopt($curl_handle, CURLOPT_URL,$jsonurl);
curl_setopt($curl_handle, CURLOPT_CONNECTTIMEOUT, 2);
curl_setopt($curl_handle, CURLOPT_RETURNTRANSFER, 1);
curl_setopt($curl_handle, CURLOPT_USERAGENT, 'YOUR APP NAME');
$json = curl_exec($curl_handle);
curl_close($curl_handle);

Source: https://stackoverflow.com/questions/697472/php-file-get-contents-returns-failed-to-open-stream-http-request-failed


Encode special character from php to mysql

Special characters may not be displayed correctly in your mysql data base when you pass php string to mysql statement.

https://github.com/phpmyadmin/phpmyadmin/wiki/Garbled_data

First thing you should do is to make sure that your mysql database encoding is set to utf-8. You can easily do that through phpmyadmin.

Then make sure the string you send are properly encoded in UTF-8 by using the php function http://php.net/manual/en/function.mb-convert-encoding.php

string mb_convert_encoding ( string $str , string $to_encoding [, mixed $from_encoding = mb_internal_encoding() ] )

Example:

$name=mb_convert_encoding($response,"UTF-8");

Lastly make sure that the first query you send to you databse is SET NAMES utf8  like in the example below:

$con=mysqli_connect("localhost","my_user","my_password","my_db");
$con->query("SET NAMES utf8");

Remove emojis script and style from wordpress

Dequeue emojis related script in your theme or child-theme function.php by adding this few lines of code:

remove_action( 'wp_head', 'print_emoji_detection_script', 7 ); 
remove_action( 'admin_print_scripts', 'print_emoji_detection_script' ); 
remove_action( 'wp_print_styles', 'print_emoji_styles' ); 
remove_action( 'admin_print_styles', 'print_emoji_styles' );

What are the http call to wp-cron.php in wordpress server logs?

The apache log of your wordpress server shows:

"POST /wp-cron.php?doing_wp_cron=1542232954.9134418964385986328125 HTTP/1.1" 200 3305 "https://www.example.com/wp-cron.php?doing_wp_cron=1542232954.9134418964385986328125" "WordPress/4.9.8;

WordPress make a http call to wp-cron.php at every site visit. This php script takes care for update check up and for schedule article publication.

WP-Cron works by: on every page load, a list of scheduled tasks is checked to see what needs to be run. Any tasks scheduled to be run will be run during that page load. WP-Cron does not run constantly as the system cron does; it is only triggered on page load.

Source: https://developer.wordpress.org/plugins/cron/

If you want to make sure some tasks are done at a certain time for sure, you can setup a cron task on your server and disable the call to wp-cron.php in the wp-config file.

There is an excellent article from wordpress developper site explaining all the details.

Note: Some sites report that if you use cloudflare or caching plugins, cron may “never run” and therefore recommend the afore-mentioned method. This assertion needs to be verified. Conclusion will be added here.

Hide wordpress error messages and warning

If error messages and warning are essential during development. They are not welcome in your production environment.

We will have a look on how to hide warnings and error messages from the public while keeping this information accessible to the admin (see https://codex.wordpress.org/Editing_wp-config.php#Debug ) .

Method one: wp-config.php  and php.ini

First we will have a look at the wp-config.php file. For this you will need an ftp access to your site.

https://codex.wordpress.org/Editing_wp-config.php#Debug

You will also need access to php.ini

Method 2: wp-config.php only

Replace:

define('WP_DEBUG', false);

by:
ini_set('log_errors','On'); ini_set('display_errors','Off');
ini_set('error_reporting', E_ALL );
define('WP_DEBUG', false);
define('WP_DEBUG_LOG', true);
define('WP_DEBUG_DISPLAY', false);
Source: https://www.templatemonster.com/help/wordpress-how-to-hide-php-warnings-and-notices.html

With this method nothing is logged (at least on my server).

For a debug friendly version use Method 3:

 // Enable WP_DEBUG mode
define( 'WP_DEBUG', true );

// Enable Debug logging to the /wp-content/debug.log file
define( 'WP_DEBUG_LOG', true );

// Disable display of errors and warnings 
define( 'WP_DEBUG_DISPLAY', false );
@ini_set( 'display_errors', 0 );

// Use dev versions of core JS and CSS files (only needed if you are modifying these core files)
define( 'SCRIPT_DEBUG', true );

Source: https://codex.wordpress.org/Debugging_in_WordPress

Message are off and error are logged. The draw back of this methods is that the logs are public at /wp-content/debug.log

How to run phpinfo()

In order to run phpinfo(), create a phpinfo.php file on your server.

You will need to have ftp access to your server.

create a file call phpinfo.php that contains the following code:

<?php
phpinfo()
?>

To run the code, simply open the page you created in your web browser by entering its address in the navigation bar following the example below:

https://example.com/phpinfo.php

given that the file phpinfo.php is at the root of the server. Replace https://example.com/ by your own server address or URL.

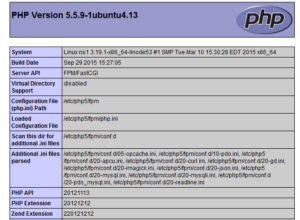
You should see a page displayed similar as the one below: