Serve webp and JPEG 2000 in wordpress

Last time we saw different methods to serve webp or JPEG 2000 pictures to our users. Now let’s see how we can implement this in wordpress

We might work something out thanks to our previous work on changing the wrapping of thumbnails: https://blog.seobytes.eu/wordpress/theme-customization/modify-thumbnails-wrapping-in-woocommerce-product-loop/

We shall also do the same operation on any other images be it post, product pages, background images, header images etc…

But let’s start with the thumbnails: the following code assume that our webp version of the images are in the same folder and have the same name than the jpg version, beside the extension.

remove_action( 'woocommerce_before_shop_loop_item_title', 'woocommerce_template_loop_product_thumbnail', 10);
add_action( 'woocommerce_before_shop_loop_item_title', 'woocommerce_template_loop_product_thumbnail', 10);

if ( ! function_exists( 'woocommerce_template_loop_product_thumbnail' ) ) {
function woocommerce_template_loop_product_thumbnail() {
echo woocommerce_get_product_thumbnail();
} 
}
if ( ! function_exists( 'woocommerce_get_product_thumbnail' ) ) { 
function woocommerce_get_product_thumbnail( $size = 'shop_catalog', $placeholder_width = 0, $placeholder_height = 0 ) {
global $post, $woocommerce;
$output = '</div class="imagewrapper"></picture>'; if ( has_post_thumbnail() ) { 
$image_url = wp_get_attachment_image_src( get_post_thumbnail_id($post->ID), $size);
$image_url =$image_url[0];
$webp_url= str_replace('jpg', 'webp', $image_url);
$output .= '<source srcset="'.$webp_url.'">';
$output .='<img class="lozad" data-src="'.$image_url.'" alt="">';
} 
$output .= '</picture ></div>';
return $output;
}
} 

With further research and the sudden realization that there might be a plugin already doing this (although, where is the fun in that?) I found the following plugins:

Webp express which is a free plugin

and Optimus which comes with a fee as far as webp conversion and serving is concerned.

While testing Webp express, it occurs that my virtual hosting does not allow for automatic conversion*. So I have written an article on how to batch convert pictures into webp

The author of Webp Express also made a php script to serve webp to supporting browser with .htaccess redirect which is a pretty elegant solution. Check the github page of the project

*My web host implemented imagick on the server after I inquired about it :) . No need to batch convert but it seems Imagick does not handle files containing a space in their name.

Next-gen image format browser support

Google page speed insights encourage you to use next-gen image formats.

One question that should arise immediately is the one of compatibility. Google has already tried to push its highly efficient image format webp since launch in 2010 the 30th of September,   but without compatibility by competiting browsers such as safari, firefox or internet explorer and edge,  webmaster did not adopt it as it required browser detection to serve the proper image format to the corresponding browser or load a javascript file to insure compatibility.

Nowadays it is not one but three so-called “next-gen” format that are available on the market, each compatible with a single major browser. Although things are about to change for webp.

JPEG 2000: Safari and Safari Mobile, Chrome Mobile, Facebook on IOS, Google search app. about 14% market share all device included.

JPEG XR: internet explorer and edge

WebP: Chrome, Edge and Firefox 65 in 2019.  with

61.51% and soon 66% with Firefox compatibility.

As we can see the compatibility range for webp has increased although Apple format JPEG 2000 is perfectly at ease in mobile environment but represent only 14% market share globally.

source:

https://www.scientiamobile.com/jpeg-2000-jpeg-xr-support-browser/

https://www.zdnet.com/article/firefox-and-edge-add-support-for-googles-webp-image-format/

http://gs.statcounter.com/


Now that we have some information on the different picture formats market share, we need a  way to share the right image to the correct browser. You can achieve this by using srcset

Use srcset to select each file type. Srcset is an image property that lets you toggle between images based on various criteria, such as high-resolution displays which are typically only seen on newer laptops and mobile phones.”

https://shubox.io/blog/2018/05/10/choosing-the-right-next-gen-format-for-your-images/

We could ponder on the inability of the industry to make changes and agree on the adoption of a new single format required by the exponential rise of data transiting in our network and the corresponding needs of space in servers for caching and indexing those data, but I’d like to reflect on the opportunity to adopt not one but two or three of those format.

The strategy would be to take the advantage of lazy load to take the time to get the device browser and fetch the proper image version only when required, those keeping the page load time low.

To get the screen resolution with javascript:

window.screen.width *window.devicePixelRatio  window.screen.height * window.devicePixelRatio

Source: https://stackoverflow.com/questions/2242086/how-to-detect-the-screen-resolution-with-javascript

Knowing the screen resolution, we can then serve the best suited pictures.

Actually a better way to serve different picture depending on screen resolution would be to use srcset introduce with hml5:

<img alt="my awesome image"
  src="banner.jpeg"
  srcset="banner-HD.jpeg 2x, banner-phone.jpeg 640w, banner-phone-HD.jpeg 640w 2x">

“The above would serve banner-phone.jpeg to devices with viewport width under 640px, banner-phone-HD.jpeg to small screen high DPI devices, banner-HD.jpeg to high DPI devices with screens greater than 640px, and banner.jpeg to everything else.”

srouce: https://www.html5rocks.com/en/mobile/high-dpi/

The syntax I currently used is the following:

<picture>
  <source media="(min-width: 650px)" srcset="img_pink_flowers.jpg">
  <source media="(min-width: 465px)" srcset="img_white_flower.jpg">
  <img src="img_orange_flowers.jpg" alt="Flowers" style="width:auto;">
</picture>

The advantage here is to be able to use the media attribute and instead of the width use the screen resolution in dpi:

resolution Specifies the pixel density (dpi or dpcm) of the target display/paper.
“min-” and “max-” prefixes can be used.
Example: media=”print and (resolution:300dpi)”

And the good news is that it works with amp-img elements too:

<amp-img alt="Hummingbird"
  src="images/hummingbird-wide.jpg"
  width="640"
  height="457"
  layout="responsive"
  srcset="images/hummingbird-wide.jpg 640w,
            images/hummingbird-narrow.jpg 320w">
</amp-img>

Source: https://www.ampproject.org/docs/design/responsive/art_direction

last but not least it seems to work out of the box for webp with src picture as fallback:

<picture> 
<source srcset="img/awesomeWebPImage.webp" type="image/webp"> 
<source srcset="img/creakyOldJPEG.jpg" type="image/jpeg"> 
<img src="img/creakyOldJPEG.jpg" alt="Alt Text!"> 
</picture>

according to: https://css-tricks.com/using-webp-images/

why it works : https://developers.google.com/speed/webp/faq

HTML5 <picture> element

HTML5 supports a <picture> element, which allows you to list multiple, alternative image targets in priority order, such that a client will request the first candidate image that it can display properly. See this discussion on HTML5 Rocks. The <picture> element is supported by more browsers all the time.

source:

For high dpi screens, you will get the best results by serving pictures that are twice their size on screen and heavily compressed with image quality down to 20. The picture will look crispier on high dpi display than the uncompressed picture served full-size. The loss of quality on standard display will be minimal so you can even go with generalizing the process for all platform. The advantage on top of the crispiness on high-dpi is that the picture is actually lighter than the original.

But even more important in our case, we want to know what image format the browser supports.

As I plan to use implement amp, I looked at info about device detection and amp, and this stackoverflow pop-up and was quite satisfying:

https://stackoverflow.com/questions/37103814/how-does-the-server-know-when-to-serve-an-amp-page

Here is an async example code for webp:

async function supportsWebp() {
  if (!self.createImageBitmap) return false;
  
  const webpData = 'data:image/webp;base64,UklGRh4AAABXRUJQVlA4TBEAAAAvAAAAAAfQ//73v/+BiOh/AAA=';
  const blob = await fetch(webpData).then(r => r.blob());
  return createImageBitmap(blob).then(() => true, () => false);
}

(async () => {
  if(await supportsWebp()) {
    console.log('does support');
  }
  else {
    console.log('does not support');
  }
})();

source: https://davidwalsh.name/detect-webp

a similar example is given in the google webp source given above.

Last thing to see will be the use of CSS sprite and we will have a complete overview on the question.

Modify thumbnails wrapping in woocommerce product loop

You might want to wrap your woocommerce product thumbnails in specific elements and classes.

We will explore how to do that:

wp_get_attachment_image()

It is possible to modify image wrapping by a simple hook in function.php

remove_action( 'woocommerce_before_shop_loop_item_title', 'woocommerce_template_loop_product_thumbnail', 10);
add_action( 'woocommerce_before_shop_loop_item_title', 'woocommerce_template_loop_product_thumbnail', 10);


if ( ! function_exists( 'woocommerce_template_loop_product_thumbnail' ) ) {
function woocommerce_template_loop_product_thumbnail() {
echo woocommerce_get_product_thumbnail();
} 
}
if ( ! function_exists( 'woocommerce_get_product_thumbnail' ) ) { 
function woocommerce_get_product_thumbnail( $size = 'shop_catalog', $placeholder_width = 0, $placeholder_height = 0 ) {
global $post, $woocommerce;
$output = '<div class="imagewrapper">';

if ( has_post_thumbnail() ) { 
$output .= get_the_post_thumbnail( $post->ID, $size, ); 
var_dump($output); 
} 
$output .= '</div>';
return $output;

}
}

The data from get_the_post_thumbnails() comes from: https://developer.wordpress.org/reference/functions/wp_get_attachment_image/

That’s where the img html is formed. This is what I would like to modify. That would require to rewrite the whole wordpress loop if I am not mistaken.

Accessing the image URL might be enough to get us the desired result. To be complete, we should also get the image size and class.

$image_url = wp_get_attachment_image_src( get_post_thumbnail_id($post->id), $size)[0];
get_post_meta( get_post_thumbnail_id($post->ID), '_wp_attachment_image_alt', true );

Current working code:

remove_action( 'woocommerce_before_shop_loop_item_title', 'woocommerce_template_loop_product_thumbnail', 10);
add_action( 'woocommerce_before_shop_loop_item_title', 'woocommerce_template_loop_product_thumbnail', 10);


if ( ! function_exists( 'woocommerce_template_loop_product_thumbnail' ) ) {
function woocommerce_template_loop_product_thumbnail() {
echo woocommerce_get_product_thumbnail();
} 
}
if ( ! function_exists( 'woocommerce_get_product_thumbnail' ) ) { 
function woocommerce_get_product_thumbnail( $size = 'shop_catalog', $placeholder_width = 0, $placeholder_height = 0 ) {
global $post, $woocommerce;
$output = '<div class="imagewrapper">';

if ( has_post_thumbnail() ) { 
$image_url = wp_get_attachment_image_src( get_post_thumbnail_id($post->ID), $size);
$image_url =$image_url[0];
# $output .= get_the_post_thumbnail( $post->ID, $size, ); 
$output .='<img class="lozad" data-src="'.$image_url.'" alt="">';
var_dump($output); 
} 
$output .= '</div>';
return $output;

}
}


Remove emojis script and style from wordpress

Dequeue emojis related script in your theme or child-theme function.php by adding this few lines of code:

remove_action( 'wp_head', 'print_emoji_detection_script', 7 ); 
remove_action( 'admin_print_scripts', 'print_emoji_detection_script' ); 
remove_action( 'wp_print_styles', 'print_emoji_styles' ); 
remove_action( 'admin_print_styles', 'print_emoji_styles' );

What are the http call to wp-cron.php in wordpress server logs?

The apache log of your wordpress server shows:

"POST /wp-cron.php?doing_wp_cron=1542232954.9134418964385986328125 HTTP/1.1" 200 3305 "https://www.example.com/wp-cron.php?doing_wp_cron=1542232954.9134418964385986328125" "WordPress/4.9.8;

WordPress make a http call to wp-cron.php at every site visit. This php script takes care for update check up and for schedule article publication.

WP-Cron works by: on every page load, a list of scheduled tasks is checked to see what needs to be run. Any tasks scheduled to be run will be run during that page load. WP-Cron does not run constantly as the system cron does; it is only triggered on page load.

Source: https://developer.wordpress.org/plugins/cron/

If you want to make sure some tasks are done at a certain time for sure, you can setup a cron task on your server and disable the call to wp-cron.php in the wp-config file.

There is an excellent article from wordpress developper site explaining all the details.

Note: Some sites report that if you use cloudflare or caching plugins, cron may “never run” and therefore recommend the afore-mentioned method. This assertion needs to be verified. Conclusion will be added here.

Hide wordpress error messages and warning

If error messages and warning are essential during development. They are not welcome in your production environment.

We will have a look on how to hide warnings and error messages from the public while keeping this information accessible to the admin (see https://codex.wordpress.org/Editing_wp-config.php#Debug ) .

Method one: wp-config.php  and php.ini

First we will have a look at the wp-config.php file. For this you will need an ftp access to your site.

https://codex.wordpress.org/Editing_wp-config.php#Debug

You will also need access to php.ini

Method 2: wp-config.php only

Replace:

define('WP_DEBUG', false);

by:
ini_set('log_errors','On'); ini_set('display_errors','Off');
ini_set('error_reporting', E_ALL );
define('WP_DEBUG', false);
define('WP_DEBUG_LOG', true);
define('WP_DEBUG_DISPLAY', false);
Source: https://www.templatemonster.com/help/wordpress-how-to-hide-php-warnings-and-notices.html

With this method nothing is logged (at least on my server).

For a debug friendly version use Method 3:

 // Enable WP_DEBUG mode
define( 'WP_DEBUG', true );

// Enable Debug logging to the /wp-content/debug.log file
define( 'WP_DEBUG_LOG', true );

// Disable display of errors and warnings 
define( 'WP_DEBUG_DISPLAY', false );
@ini_set( 'display_errors', 0 );

// Use dev versions of core JS and CSS files (only needed if you are modifying these core files)
define( 'SCRIPT_DEBUG', true );

Source: https://codex.wordpress.org/Debugging_in_WordPress

Message are off and error are logged. The draw back of this methods is that the logs are public at /wp-content/debug.log

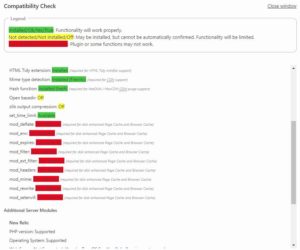
W3 Total Cache plugin doesn’t detect apache modules

Issue description: “After running a compatibility check in W3 total cache on WordPress, the following apache modules are not detected:

mod_deflate: Not detected (required for disk enhanced Page Cache and Browser Cache)
mod_env: Not detected (required forhanced Page Cache and Browser Cache)
mod_expires: Not detected (required for disk enhanced Page Cache and Browser Cache)
mod_filter: Not detected (required for disk enhanced Page Cache and Browser Cache)
mod_ext_filter: Not detected (required for disk enhanced Page Cache and Browser Cache)
mod_headers: Not detected (required for disk enhanced Page Cache and Browser Cache)
mod_mime: Not detected (required for disk enhanced Page Cache and Browser Cache)
mod_rewrite: Not detected (required for disk enhanced Page Cache and Browser Cache)
mod_setenvif: Not detected (required for disk enhanced Page Cache and Browser Cache)

source: https://support.plesk.com/hc/en-us/articles/115005108854-W3-Total-Cache-plugin-shows-apache-modules-as-not-detected-

According to this source W3 Total Cache cannot detect php module if mod_php is disabled on an apache server. They also indicate that “mod_php is disabled […] by default because it is not secure (mod_php is outdated).

Solution:

1- Verify that indeed this services are correctly activated.  In order to do so run phpinfo() (see “how to run phpinfo()” )

2- Once confirmed, the error messages can therefore be ignore.

w3 total cache compatibility check not detected