replace “alternative_profile_name” with the user name you want to use. It is usefull if you engage in multilanguage SEO activity to have profile set with different languages as default. Or if you work in a different language that the one you use for your everyday account, you can have a “professional” profile setting with all the appropriate default.
You might also need to open Incognito window to check website without your browser cache. Emptying your cache everytime can be cumbersome, so you can simply open an incognito window:
start chrome /incognito
For that matter I rather use a Firefox developer installation set to not cache anything.
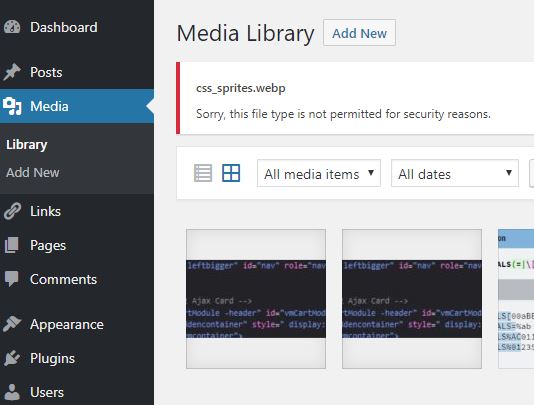
wordpress and webp: “Sorry, this file type is not permitted for security reasons.”
Error message when uploading a webp image in wordpress media library
Certain image type like svg, jpeg2000 or webp raises an error when you try to upload them in wordpress as shown in the picture above.
We have already covered how to implement webp in wordpress but there might be some cases where you might want to upload this image manually and serve them to supporting browser via your own script if necessary (that’s not the case for svg though).
Add the following snippet of code to the functions.php file of your template. Comment out or delete the line for the mime type you are not interested in.
At the time this article was written, if you include some external file in a page using PHP and that file starts with a BOM, it may create blank lines.
This is because the BOM is not stripped before inclusion into the page, and acts like a character occupying a line of text. See an example. In the example, a blank line containing the BOM appears above the first item of included text.
Prepare your css sheet in an image editor. The final format will be in png to keep your images as sharp as possible, webp is also a good candidate if you take care of the brower support.
When laying out your images on the css sprite image, make sure to use consistent spacing between the images. It will help when styling your sheet and keeping it minimal.
You indicate the size of the portion of the picture of the sprite you want to show in the css code. If you want to reuse the height and width of your styling as much as possible, make sure that the image are at least height and width apart from each other (measure from their top left corner as this is the coordinate you will use to display the proper part of the CSS sprites.
Note that this is a cylinder system of coordinate which means if the height you set is larger than the height left between the top left corner of your image and the bottom of the sprite sheet, the remnant will be carried over at the top of the sprite and everything within that value will be displayed. In other words, the sprite repeats itself until it covers the entire height you set.
It works in a similar pattern for the width.
As mentioned above, you indicate what part of the sprite to display by entering the coordinate of the top left corner of your image on the sprite. The top left corner of the sprite is the origin of the coordinate system. Along the top of your image you will have the y axis and along the left side of your image you will have the x axis. So every point in your image will have negative coordinate.
I choosed x and y, because the coordinate along the height of the image will be entered first while the coordinate along the width, second. This match the usual (x,y) way of representing 2D coordinate so that’s why I use this terminology.
The best way to securely create and hold your private key is to do so on an encrypted drive. In that way only you will have access to the data even in the event your drive get lost or stolen.
Why creating a private key directly on an encrypted drive is more secure?
In case you stored your private key on a non encrypted drive, keep in mind that, even if you delete the key from the drive, the data will still be accessible through data recovery process. The only way to make sure the data is not accessible after you erase them is to write zero to the drive, which means you will lose any other data stored on that drive in the process.
That’s the main reason why you should create your private key securely directly on an encrypted drive and don’t move them around. Backup of the key should be also held on an encrypted drive.
To generate your SSL key pair, download and install openSSL.
Generating self signed certificate:
On a windows machine after installing
and setting up openssl:
run
cmd
cd C:\OpenSSL-Win32\bin
change the path after the cd command to your OpenSSL installation path
openssl genrsa -des3 -out server.key 4096
enter pass phrase for server.key:
Important:
enter a password here, nothing will be displayed on
screen, you will be ask to confirm this password that will be used
during the next step
This is the pass phrase you created
at the previous step.
Important:
leave challenge password blank, virtuemart won’t be
able to validate the certificate if anything is entered as chanllenge
password. Leave it blank.
Flexbox is perfect to manage nice and responsive layout in modern browser. Let’s see how we can integrate it with horme 3 template for virtuemart, together with lazyloading.
Our first implementation does not give desirable result.
The issue is that there is only 3 items per row, leaving an empty column. The add to cart button seems to go all over the place as soon as the third row is reached.
The add to cart button need to be pushed at the bottom of the div. It seems the div height change depending on the scrolling. Everything is fine when the css load but if scrolling down then up, then the div might be displayed with a “too short” height, hiding the add to cart button in the process.
To implement lazy loading (with this method) in virtuemart category page, you will need to add a class to the thumbnail <img> element, which is easily done in /com_virtuemart/sublayouts/products.php
In your theme template, create an override for the index.php and add the javascript in the footer:
 document.addEventListener("DOMContentLoaded", function() {
  var lazyImages = [].slice.call(document.querySelectorAll("img.lazy"));

  if ("IntersectionObserver" in window) {
    let lazyImageObserver = new IntersectionObserver(function(entries, observer) {
      entries.forEach(function(entry) {
        if (entry.isIntersecting) {
          let lazyImage = entry.target;
          lazyImage.src = lazyImage.dataset.src;
          lazyImage.srcset = lazyImage.dataset.srcset;
          lazyImage.classList.remove("lazy");
          lazyImageObserver.unobserve(lazyImage);
        }
      });
    });

    lazyImages.forEach(function(lazyImage) {
      lazyImageObserver.observe(lazyImage);
    });
  } else {
    // Possibly fall back to a more compatible method here
  }
});
At this stage your code won’t work and no image will be displayed. For the code to work you need to have a data-src defined in the <img> element.
One way to do this is to locate where the <img> html for the thumbnail is generated and create an override to define a data-src instead of the usual src.
I didn’t find any documentation as to where this code is generated, so I add to search for it. I used eclipse IDE and added a local copy of my virtuemart installation as a workspace in the IDE then search the function in the folder. It was located in:
The html per say is generated by the displayIt() function. We change src to data-src in the file for the moment as it is not clear to me how I’ll be able to override this function in my theme.
My first test after settings all this is not running properly. Actually it does even seem to act the opposite it should, with the picture first loaded and that disappear when it crawls into view.
Let’s debug that. First, I checked that all my code is properly loaded, namely the class for the image and the data-src to prevent the picture to load before it come into view.
At that stage the “lazy” class is properly added to the source code but the image source is not changed to data-src as expected.
Changing this in the developer console does not solve the issue (picture still not showing) unless the srcset=”undefined” is deleted. This srcset attribute is added by the lazyload js.
By searching for <img in the mediahandler.php file I found the function displayImage(). I changed the src attribute to data-src and remove the srcset line from the lazyload javascript before running another test.
Changed src to data-src in evey img element in displayImage() and displayIt() function. Now the lazy loading function is working except for some css issue (product name appearing on overlay on the image instead of displaying below the image). Some pictures do not appear at all.
Product img elements have now data-src attribute instead of src but , they don’t have the “lazy” class so they are not displayed when they come into the view port. This might be changed in the single product view.
Product image has no class set but they don’t load. The lazy load script should not prevent image without the lazy class to load, so the issue might be that I changed the src attribute to data-src.
So the displayIt() function in /administrator/components/com_virtuemart/helpers/mediahandler.php handles picture in the product view as well as in the category view.
To add the lazy class to the product image and additional thumbnails, we need to modify default_images.php and default_images_additional.php intemplates/your_template_name/html/com_virtuemart/productdetails/
Note: that you must override these two files in your template if you don’t want to see your changes deleted by the next update.
At that point we are left with the issue that thumbnails div does not have the appropriate height which leads to the product name to overlay on the picture, which in our case is not desirable. It seems to be handled in the products.php sublayouts and the class of the div we are looking for is vm-product-media-container. The div is indeed located in this file but it does not have the style attribute that causes the issue, nor does it call a variable for this, that suppose that the inline style is added through a filter on the server side or through js or jquery on the client side.
In our case, the following inline style is injected and cause display issue: style=”height: 42px;”
This div height is related to the thumbnails height settings in the template configuration panel. In the current state, the height takes various value each time the page is refreshed. Setting the width and height to zero or empty in the configuration panel leads to no image being displayed, dynamic resizing being off.
With dynamic resizing on and a value of 100 we got a good rendering, without issue.
200 leads to some issue. This might have to do with the dynamic resizing. Let’s try to locate this code to check what’s happening there.
The style does not appear in the source code. It appears in the DOM only (chrome and firefox). This tend to show that the inline style is generated by javascript. To try to spot the script causing the issue, we will add <script>debugger</script> after the element to debug. Reload the page and add a breakpoint by following the instruction here:
style (jquery.min.js?105ec84b263645980d07d0cf26df4607:2)
(anonymous) (jquery.min.js?105ec84b263645980d07d0cf26df4607:2)
Q (jquery.min.js?105ec84b263645980d07d0cf26df4607:2)
Q (jquery.min.js?105ec84b263645980d07d0cf26df4607:2)
css (jquery.min.js?105ec84b263645980d07d0cf26df4607:2)
(anonymous) (jquery.matchHeight-min.js:8)
each (jquery.min.js?105ec84b263645980d07d0cf26df4607:2)
each (jquery.min.js?105ec84b263645980d07d0cf26df4607:2)
r.apply (jquery.matchHeight-min.js:8)
t.fn.matchHeight (jquery.matchHeight-min.js:7)
(anonymous) (jquery.matchHeight-min.js:11)
each (jquery.min.js?105ec84b263645980d07d0cf26df4607:2)
r._applyDataApi (jquery.matchHeight-min.js:11)
u (jquery.min.js?105ec84b263645980d07d0cf26df4607:2)
fireWith (jquery.min.js?105ec84b263645980d07d0cf26df4607:2)
ready (jquery.min.js?105ec84b263645980d07d0cf26df4607:2)
(jquery.min.js?105ec84b263645980d07d0cf26df4607:2)
jquery.matchHeight is a jQuery library to achieve equal height between div. In modern browsers, there are css solutions that achieve the same results: check Flexbox and CSS Grid.
So matchHeight library does not handle properly the height of the div with the lazy loading technique I am using at the moment. The script is called in the index.php file of the template. Let’s have a look how the site behave without this script.
jquery.matchHeight catch the data-mh=”media-container” attributes to perform its operation. I tried to remove it from the thumbnail wrapper and add it to the product wrapper but the result is a mess. I will check if I can rewrite the template to support Flexbox instead.
So the issue of height not being set when the src is missing or invalid has also caught the attention of css-tricks which wrote a nice article about the topic. Let’s see if we can implement their options.
I got to work out how to configure the viewport attribute in image to get the right aspect ratio.
Also the number of line of the short description is now an issue with the div height. Got to trouble shoot that.
Maybe best would be to restore all changes and reimplement lazy loading and psvg place holder from the ground up to avoid errors introduced when fiddling in the code to find out how to fix the height :)
This is my base64 placeholder (<svg></svg> method did not work):
Current issue is due to single line description not being correctly adjusted by matchHeight. Otherwise all the rest is working.
Issue was caused by some script being disabled in virtuemart configuration panel. Virtuemart CSS, jquery and Fancybox were disabled.
The place holder should have a height matching the height of the highest thumbnails. Working with normalized thumbnail picture (in terms of dimension) would make things way easier and cleaner.
Overriding templates of admin component takes place in administrator/templates/html/com_virtuemart/helpers/mediahandler.php
Check which admin theme you are using.
Log in the admin dashboard and check the page source, search for
So at that point all issues have been solved. We need to check why plain SVG failed to load correctly. Specially even with encoding an inkscape file saved as plain svg in base64, we have a file size that have nearly double compared with our current page size. Off course we don’t need to load pictures that are not in the view port which is saving bandwidth and we even gained a smoother experience as the element are already placed properly on the page thanks to the svg place holder which is inline which means no loading time and no recalculation.
That seems to be a win. We need to ensure that the file that needs changes can be overriden properly and also browser compatibility to avoid bad experience.